Категория: Компьютеры

Заметки о программировании и на околокомпьютерные темы

Вложенные категории: Delphi, Игры

Объясняю отцу, как работать с планшетом, и господи, насколько же всё в современных устройствах отвратительно. Мы ругали Windows, мол, простому человеку не понять, но как легко было объяснять его в сравнении!

“Ива… Фед…” это контакты. Видишь, “Кон…” сверху написано. Почему не влезло я не знаю, места полно. Видишь в списке “Вла…”? Нажимай на него. Мимо нажал. Всё поехало. Дай исправлю. Ты нажал на невидимый столбик, который меняет размеры. Почему невидимый? Видишь, я тоже не сразу могу найти. Блин. Да блин.

Вот, нажимай на строчку с именем. С “Вла…”. Значит, на картинку нельзя, нажимай на текст рядом с ней. Картинка открывает профиль. Неважно, что за профиль. Нажми стрелку назад, чтобы это убрать. Ещё раз нажми. Ты не нажал, поскольку пальцем елозил. Теперь слишком долго держал… Ах, тут кнопка просто не работает. Почему не работает… Дай, я всё это закрою, ты теперь вообще отсюда не вылезешь.

Осторожно, когда берёшь планшет – не зацепи экран. Ну вот, что-то задел. Дай уберу. Неважно, как убрал, держи, нажимай. Один раз, не дважды. Блин, почему экран выключился? По двойному нажатию? Кто так… Включай заново. Теперь потяни шторку… Всё, надо было тянуть, экран погас. Да, коротко. Нельзя перенастроить. Тяни! Вводи пин-код. Опять погас, быстрее вводи. Пока ты цифры ищешь… Заранее подготовься. Готов? Жми! Тяни! Набирай! Не нажалась цифра! Не нажалась, ещё нажми. Видишь, точечка не появилась. Блин, да я не знаю, почему она… Да вот же, крошечная, вот. Опять погас.

Вот я тебе звоню. Нет, вот, окошко сверху. Вот этот овальчик, видишь? Маленький. Белое на белом. Всё, ты его смахнул случайно, убралось в трей. Смотри, если нечаяно смахнул, вот так пальцем тянешь… БЛ…, 50 сообщений самсунга, долбаный спам, да какого чёрта, опять. Неважно, я удаляю, этого не будет, только нужное. То, что планшет хочет тебе сообщить. Установите помойку наших программ. Осталось совсем немного. Войдите в проклятый аккаунт, чтобы начать пользоваться. Активируйте, попробуйте, завершите настройку. 19 новостей сейчас в трендах! Готово к установке 4 рекомендованных приложения, и ещё 17, от которых вы отказались!

Нажми на контакт – это способы связи с ним. Видишь большие красивые кнопки? Это телефон и СМС, их не нажимай. У тебя симки нет, они не работают. Зачем показаны, а потому что гладиолус. Нажми сюда на WhatsApp. Видишь, появилось ме… Пропало. Почему оно пропало, я не знаю. Нажми ещё раз. Вылезла клавиатура, а как убрать. Да я сам не понимаю, как убрать, нажми назад. Программа закрылась. Просто нажимай нужные буквы. Одну, другую, пробел… Какой ещё долбаный Гугл Ассистент? Не думай, что это такое! Неважно! Я сейчас всё закрою.

КАК вообще кто-то из новичков с этой полыхающей помойкой может работать? Казалось бы, Андроиды делали для простого человека. НИЧЕГО не ведёт себя естественным образом. ВСЁ сделано бестолково, бессмысленно, глупо. Когда с этим много лет живёшь, привыкаешь к бесконечному трешу, но начинаешь учить новичка, и всё это невозможно объяснить.

Об ИИ

– Привет, 2023! Говорит 2010-й. Как дела с искусственным интеллектом? Создали, наконец, нейросеть, которая проходила бы тест Тьюринга?
– Ну… Это сложный вопрос. С одной стороны, почти единственное, в чём дела у нас как-то продвинулись – это предсказывать по отрывку текста самое вероятное следующее слово.
– Н-да. А с другой стороны?
– А с другой стороны, с такой нейросетью ты сейчас разговариваешь.

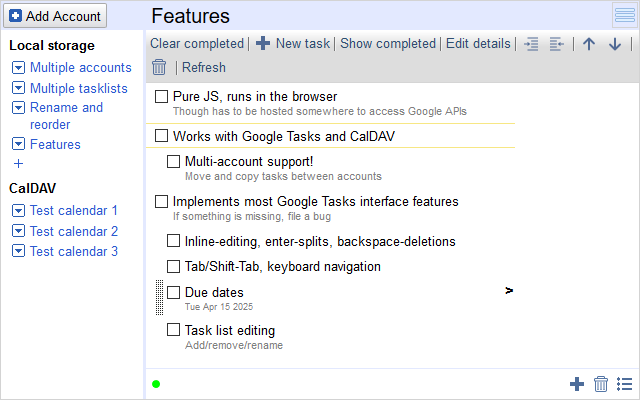
Tasks IG: CalDAV, несколько аккаунтов и интерфейс Canvas

Пока сидел весной на карантине, сделал кучу всего в Tasks IG:

  • Поддержка CalDAV! Можно самому хостить задачи, а не полагаться на Гугл
  • Поддержка нескольких аккаунтов, например, Google Tasks и ваш CalDAV одновременно. Задачи можно переносить и копировать между аккаунтами, аккаунты переименовывать и упорядочивать
  • Окно настроек. Восстановление удалённых задач в Google Tasks
  • “Сохранить и продолжить редактирование задачи”
  • Открытая страница запоминается в URL, перезагрузка не сбрасывает
  • Интерфейс Google Canvas! На него автоматически переключается на полном экране. Можно добавлять и свои CSS

Страница на Github — и запуск оттуда

Расширение для Chrome (ещё проверяется)

Расширение для Firefox/Opera

Windows, AHCI/RAID and INACCESSIBLE_BOOT_DEVICE

When you switch SATA from AHCI -> RAID or back in BIOS, Windows may fail to boot with INACCESSIBLE_BOOT_DEVICE. There are several pieces of advice on the internet that work only sometimes. You will now understand why. This is an ultimate guide to fixing every driver-related INACCESSIBLE_BOOT_DEVICE out there.

You can jump straight to instructions but life is messy and blind copying often doesn’t work.

TLDR Why this happens

Windows needs to see the disk from which it boots. Bootloader initially cheats and jumpstarts Windows, but then Windows needs to quickly load drivers that can talk to the disk properly.

INACCESSIBLE_BOOT_DEVICE happens if after loading all boot-time drivers Windows doesn’t see the boot disk runtime device around.

How Windows loads drivers

Every PNP device has an ID, something like VEN_8086&DEV_06D6&SUBSYS_86941043&REV_00. Each driver has an INF file which lists the devices it can service. Windows keeps a library of known drivers ("Driver Store"). When it discovers a new device it looks through that library for a driver that can handle it.

If Windows finds a compatible driver it installs it and saves the device permanently in the registry. Next time it sees the same device it will load that installed driver directly. The devices are saved in HKEY_LOCAL_MACHINE\System\CurrentControlSet\Enum.

A driver is a program running in the background. When Windows loads a driver for the device it explains which device has to be serviced (by giving it that registry key). The driver then creates a runtime device object. Only one copy of the driver will be running even if it services multiple devices.

So there are three different things:
– Hardware device attached to the PC, known to Windows by its PNP ID
– Registry entry for the device’s PNP ID
– Runtime device object

Hardware device that has no driver won’t get a registry entry and a runtime device object. You can still see such devices in the Device manager with an exclamation mark.

If you detach an installed hardware device its registry entry will remain. But a driver won’t be loaded and a runtime device object won’t be created. You can see such devices if you check "Show hidden devices" in Device manager.

You can check the attached PNP device IDs with a tool like devcon.exe. (Note that Windows won’t see PNP IDs of devices attached further to the devices it has no drivers for).

Boot devices

Boot devices are those that are critical for Windows to boot. Disk controller is a prime example.

Windows cannot install devices and drivers at boot time. The Driver Store and the registry itself are stored on disk which is inacessible. All the boot devices and drivers have to already be in the registry (which is read once at the very beginning, via cheats).

This is why you can replace your graphics card and Windows may find new drivers automatically but you cannot simply switch from AHCI to RAID and back. Your "AHCI controller" will disappear and a new "RAID controller" appear; Windows cannot install drivers for this new device at boot time.
You have to boot to install drivers but you have to have drivers to boot.

Thankfully many drivers will discover "their" devices even without registry entries. For these devices it’s enough to have the driver itself registered and started at boot; it’ll create runtime objects, you don’t need to have CurrentControlSet\Enum device keys.

This is why there’s advice to preinstall RAID controller drivers. If you preinstall the drivers and configure them to auto-start despite not having any devices to service (another piece of advice), the drivers just might see their devices and let you boot – where you can install the devices properly.

How Safe Mode is different

There’s advice to enable RAID and boot to Safe Mode first. Why?

In Safe Mode, Windows automatically boots all boot-time drivers even if there are no registered devices that need that. So this advice still needs you to preinstall RAID controller drivers, and it’s the same as configuring those drivers to auto-start, only safer and easier.

oem*.inf and installed third-party drivers

Once Windows installs a driver, it creates a key for it in the registry: HKEY_LOCAL_MACHINE\System\CurrentControlSet\Services. This key controls when the driver is started and lists devices associated with it.

Drivers can be forcefully installed by installing their inf files. There’s a number of ways to do that, one is to right-click the file and choose "Install". Another is pnputil /add-driver.
INF files that are installed this way are copied into Windows with names like oem0.inf, oem1.inf etc. You can list all third-party drivers with pnputil /enum-drivers or dism /Online /Get-Drivers or uninstall them with either of these utilities.

Simple case: Preinstall drivers

The standard advice just may work in many cases:

  1. Install latest drivers for your RAID controller, either via setup or by force-installing their INF files if the installer seems too smart for its own good.
  2. If you have older versions of the same driver installed you may choose to delete them to be on the safe side.
    To do this, reboot after installing the new version to hopefully let all devices switch to the newer versions. Use dism /Get-Drivers or pnputil to enumerate all oem*.inf drivers. Find the ones to be deleted and use pnputil to delete them.
  3. Reboot in RAID mode and go straight to Safe Mode. Hopefully your boot-time RAID controller driver will load, see the RAID controller and let Windows boot from it.
  4. Install RAID controller drivers again from Safe mode to register the device properly.

Why can this process fail?

  1. Your RAID controller driver does not auto-discover supported devices.
  2. Some INF files are written in a way that if they don’t see the device at the moment of installation they won’t install everything that’s needed to run it.
    A popular example is iaStorAC.inf. When preinstalled on a system without RAID controller attached it won’t install iaStorAfs filter driver. When you later reboot in RAID mode it sees a RAID controller but fails to initialize because iaStorAfs is not installed.

In both cases it’s not enough to preinstall a driver; you also need a registry key for a device.

Messy case: Preinstall a boot time device

Now that you know everything you may imagine a number of solutions such as manually installing iaStorAfs. But here’s a more resilient version.

  1. Prepare a flash drive with unpacked drivers for your RAID controller and a number of utilities, including devcon.exe. All utilities must be of exactly the OS bitness – 32bit emulation doesn’t work in recovery mode.
  2. Boot into recovery mode and open command prompt.
  3. Use devcon to list all devices in the system. Find the RAID controller and take note of its PNP ID. Open your driver’s inf file and check that it services this PNP ID. If not, you need newer drivers.
  4. Open your driver’s inf file and check that if it’s install sections have OS identifiers attached (".NTamd64-10.0.1") then your OS is supported. See INF format docs, Manufacturer section.
  5. Use Windows\System32\drvload.exe to load your RAID controller driver.
  6. If everything goes right, this recovery system now has that driver loaded!
    Check the device list again to verify that the RAID controller now has a more personalized name. Check that the device list now has your hard drive too or use diskpart list disk to verify that the disk is visible.
    If something went wrong, stop at this point. Figure out why the driver isn’t loading. It’s pointless to try and install a driver that doesn’t load.
  7. Start regedit. This system now has the driver and the device installed. Go to the following keys and export them as reg files to your flash or hard drive.
    • HKEY_LOCAL_MACHINE\SYSTEM\CurrentControlSet\Enum\PCI\VEN_8086&DEV_06D6&SUBSYS_86941043&REV_00
      This is the device node. Find the one matching your PNP ID.
    • HKEY_LOCAL_MACHINE\SYSTEM\ControlSet001\Control\Class\{4d36e97b-e325-11ce-bfc1-08002be10318}This is the class registration node. This one is for SCSI controllers; if you need a different one, find it by looking inside them

    For the good measure look up all places in the registry where oem0.inf is mentioned (that’s how Windows renamed the inf you’ve just installed). Export all those.

  8. Now disable the RAID mode and reboot into normal OS.

You now have registry export files with registration information for the RAID controller device. Your have to adjust these files and import them, making this copy of Windows think it saw this device.

What do you need to adjust?

  1. Preinstall the driver as per simple case. Take note of what "oem*.inf" name it got.
  2. You’ll only need to import the Enum\PCI\… and Control\Class\.. files. The rest are just in case.
  3. In both of those, replace oem0.inf with the oem*.inf for your imported driver.
  4. Go to the registry and find those keys. See which 0000, 0001 etc keys are already there; change your reg files so that they take the yet unused key numbers.
  5. Delete any parts of those files that duplicate the already existing keys. For instance, all key=value pairs directly inside Control\Class\{4d36e97b-e325-11ce-bfc1-08002be10318} are not needed. Leave only keys directly related to your device, the less you touch things outside of that, the better.
  6. Very carefully take ownership of both of the keys where you’re going to import these, and give your account full permission. Make sure SYSTEM, Administrators and other accounts that had permissions over those keys before get to keep them.
  7. Import the reg files. If there are any problems, stop here and solve them until the import works. Verify that what you have in the registry now matches the reg files.
  8. Reboot the PC normally. Now go to the Device Manager and enable "Hidden devices". You should see that RAID controller that you’ve just imported as a reg file. If you don’t, solve this before going further.

Okay, now you have an offline device for your RAID controller! From here on try these actions, starting from the simplest:

  1. Reboot into RAID mode. Things may just work.
  2. Reboot into RAID Safe mode. If successful, install the drivers.
  3. If neither RAID normal nor RAID safe mode boots, but you still see the RAID controller in "Hidden devices" in AHCI mode, try installing RAID drivers from AHCI mode, preferably via their setup.
  4. As a last resort, right-click the "hidden device" in Device manager and "Update drivers" this way. Then try booting in RAID Safe mode again.

Additional help

Use pnputil and devcon to manage drivers and devices.

Use dism /Online /Get-Drivers. Dism is available even in the recovery console and while it can’t uninstall drivers from /Online systems (use pnputil), in recovery console it CAN uninstall from the main OS.

If you’re stuck in a recovery loop (without Windows even attempting to boot into normal mode), do bcdedit /set {current} recoveryenabled No. After that you’ll be getting a bluescreen instead of going into recovery, and what would you think! You can STILL go into recovery from that bluescreen, but you also get a problem description and you can also restart in Safe Mode and other things.

To access the main OS registry from recovery, open regedit, select HKEY_USERS and File > Load hive. Load the Windows\System32\drivers\config\SYSTEM for HKEY_LOCAL_MACHINE from your main OS. It’ll load under HKEY_USERS so importing .reg files won’t work but you can edit things by hand.

For the purposes of this guide drive letters don’t matter. In earlier Windows versions drive letters could become mixed and Windows would fail to find C:\Windows because it’s now D:\Windows. This can still happen later in the boot process but the kernel and the bootloader are now mostly drive letter agnostic, they know how to tell one physical disk-thing from another. If it says INACCESSIBLE_BOOT_DEVICE then it’s really inaccessible.

GPT и разум

Даже то, что GPT2/3 делает с текстами уже магия. Он сочиняет новости, пишет стихи, ему можно сунуть любой текст, попросить “TLDR:” и он перескажет своими словами.
Кто-то накормил этот генератор всеми текстами Юдковского и заставил его генерировать новые посты, и он сочиняет почти осмысленные тексты! Даже кажется, ТЫ САМ их не понимаешь как следует, а смысл есть.

То есть, GPT не подбирает наугад, у него есть представление о предмете речи. Но самое удивительное: он заранее не знает, что скажет! Каждый раз он выбирает одно новое слово; чтобы получилось предложение, его нужно спрашивать снова и снова. Связность речи хранится не в скрытых переменных, а в самой речи и в памяти GPT вообще.

в самой речи и в памяти GPT вообще.

Мне и самому часто кажется, что пока я мысль не выразил в словах, никакой мысли и нет, а есть только интуитивное ощущение, вроде того, что бессловесно руководит животными. Из него как-то рождаются слова, одно за другим, и рождение это бессловесно. Если остановиться и спросить себя: какие слова я заготовил дальше? Обычно этих слов нет. Знаешь только направление мысли.

А теперь кто-то запряг её рисовать картинки! И она их рисует! Это магия какая-то, так не бывает!

Последние 50 лет все, кто понимает в компах, объясняли, что невозможно “сделать искуственный интеллект вообще”, нет никакого “секрета разума”, можно только решать сотни сложных задач типа распознавания объектов, речи, и результат в одной не переходит магически в другую.
И вот пожалуйста, программа для генерации текста рисует картинку, причём по строкам без разделения строк, просто ниточку точек. Мистика.

Velocheck

Доработал и всё-таки выложил супер-лёгкий клиент для московского велопроката Velobike:

  • Не нужно логиниться
  • Мгновенно загружается
  • Открываете приложение – сразу видите избранные парковки

Поскольку аккаунта в Google Play у меня нет и 25 баксов я платить не хочу, то качайте APK вручную. Кто хочет, может его релизить.

Как удалить “MegaFon Pro”

С тех пор, как я сменил симку, на Андроиде в списке приложений появилось “MegaFon Pro”. Это SIM-приложение, т.е. записанные на SIM инструкции, которые специальная программа в Андроид исполняет. То есть, симка-то ваша пассивна, но в мобильнике есть бэкдор, сделанный для сотовых операторов.

Приложение, которое исполняет это SIM-меню, называется com.android.stk/com.android.stk2, удалить его без рута обычно нельзя. Ладно бы эта штука сидела тихо, но она раз в пару месяцев показывает всплывающие окна с рекламой. Это такая фича у Мегафона, доставать своих клиентов.

Я раза четыре звонил, заходил в Мегафон, обращался через сайт, и мне “всё-всё отключали”, ставили всевозможные запреты на рекламу и блокировки, и всё равно реклама вылезала вновь. Единственный способ от этого избавиться это получить симку, на которой пометки такого приложения нет, или зарутить телефон, у чего свои минусы. Но сервисная служба Мегафона то ли не знает этого, то ли не может.

Похоже, существует всё-таки способ отключить приложение без рута. Подключитесь по adb shell:

pm disable-user com.android.stk
pm disable-user com.android.stk2
pm uninstall -k –user 0 com.android.stk
pm uninstall -k –user 0 com.android.stk2

Это удаляет приложение только для текущего пользователя. Рут при этом не требуется. В системе оно остаётся, но неактивно. Если его надо будет однажды вернуть:

cmd package install-existing com.android.stk
cmd package install-existing com.android.stk2

Посмотрим, достаточно ли этого.

Logrotate creates empty compressed log files

Case study: After some changes I’ve noticed logrotate flushes the main log (as it should) but all gzipped archived copies it creates are empty (20b). Logrotate destroys logs instead of preserving them.
You had one job, logrotate!

Turns out my logrotate file looked like this:

/var/log/httpd/*_log /custompath/log/*_log {
..
create ...
}

And the latter had been symlinked to the former.

It made sense when I wrote that. Cover all the bases. But the way logrotate works, it first scans all paths for files that need rotating and then applies rotation to them all.

So if I have /custompath/log/error_log reflected as /var/log/httpd/error_log, logrotate notices two files in need of rotation. It then compresses the first one, replaces it with empty log (create), then compresses the second one (now empty) and replaces the first .gz with an empty archive.

Nice job, logrotate. Make sure the collected filenames resolve to unique files? Nope. Maybe at least don’t overwrite already existing gzips? Nope.

Tasks IG

У Гугла был удобный интерфейс к гугл-задачам, похожий на панель браузера. Назывался mail.google.com/tasks/ig. Разумеется, гугл его закрыл.
Убив больше времени, чем хотелось бы, я написал такое же с нуля:

https://github.com/himselfv/tasks-ig

  • Асинхронные запросы, как в старом клиенте
  • Дополнительный бэкенд, хранящий задачи в LocalStorage (впрочем, я бы всерьёз там задачи не хранил)
  • Когда-нибудь я напишу бэкенд на CalDAV Tasks, если никто не напишет
  • Можно написать отдельное расширение с бэкендом в extension storage, тогда ничего не надо будет хостить

Рабочую версию можно посмотреть на https://himselfv.github.io/tasks-ig/. К гуглу из неё подключиться вы не сможете, но локальные задачи работают.

The Talos Principle

Portal от создателей Serious Sam, который набит попсовой философией. Интерес к этой игре проходит такие стадии:

1. Ох, игрой руководит Голос Бога. Это офигенно.
2. Ох, это Портал.
3. Ох, как же надоела эта унылая псевдофилософия. Особенно помощник Милтона. Бесцельные беседы с 3 неудачными вариантами ответа на каждом шаге это именно то, что убедительно передаёт ваши взгляды на сложные вопросы.
4. Ну ладно, так и быть, я найду все звёзды, пройду все дополнительные уровни, получу все концовки и ачивменты, только не подумайте, что я делаю это ради вас. Хмпф! Google: “как спасти помощника Милтона” “как спасти помощника Милтона, не проходя заново пол-игры” “talos principle быстрое прохождение”

Что в игре хорошо, это паззлы, они действительно захватывающие. Уровни на движке Сериос Сэма большие и красивые. Представьте себе Портал с красочными открытыми уровнями. И много секретов, которые можно с удовольствием искать.
Под конец даже немного проникаешься бестолковым сюжетом, ладно уж.

Похоже, не стоит играть в русском переводе. Голос Бога в нём хороший, и откровенных ляпов нет, но вся игра съезжает на пару ступеней фальшивости. Актриса в звукозаписях так надрывается и заламывает руки, что все её проблемы кажутся чушью. Беседы с Милтоном переведены фраза за фразой, при этом над логикой разговора никто не думал. Мне даже жалко ту часть игры, которую я прошёл на русском: вдруг в английском появился бы смысл?